Linux
08 March 2026
CachyOS Install Guide
17 January 2026

Author
Senka WolfTable of Contents
CachyOS Install Process
Now we will be going through the install process of CachyOS, this will put you into a live user environment desktop.
- Connect to the internet by using the taskbar if you are using Wi-Fi. If you are using ethernet then you should already be connected.
- You should see a CachyOS Hello screen open, if not go to the app menu and search for hello and you will see the CachyOS Hello application.
- Now press the Launch installer button.
- Bootloader - Pick Grub.
- Select your language then press next.
- Select your region then press next.
- Select your keyboard layout then press next.
- Select storage device: Pick the drive you wish to install Linux on or the partition you made earlier if you are dual booting.
- Select Replace a partition.
- Make sure the dropdown says btrfs.
- Select a partition to install on: Click on the grey free space on the bar and the install will select all the free space on the partition.
- Then press next.
- Now pick the desktop environment you want to use. I prefer and recommend Plasma.
- Packages: Leave the default ticked ones as is. If you use a HP printer/scanner then you may want to tick Support for HP Printer/Scanner.
- Users: Now fill out your user account information.
- Summary: Now press install.
- Once it is done restart your computer and remove your USB device.
Now we need to ensure Windows shows up in the GRUB boot manager screen so you can boot to either system. To do this open the console/terminal and do the following:
$ sudo nano /etc/default/grubThis will open the grub config in the terminal which will look similar to the below. Look for the below lines and change them, I have added comments to the example below as well.
GRUB_TIMEOUT='5'→GRUB_TIMEOUT='30'- Changes the default timer.#GRUB_DISABLE_OS_PROBER=false→GRUB_DISABLE_OS_PROBER=false- Uncomment this line so GRUB can look for the Windows boot loader and can add it to the GRUB boot manager screen.
$ # GRUB boot loader configuration
$
$ GRUB_DEFAULT=0
$ GRUB_TIMEOUT='5' #Change this from 5 to 30.
$ GRUB_DISTRIBUTOR='CachyOS'
$ GRUB_CMDLINE_LINUX_DEFAULT='nowatchdog nvme_load=YES zswap.enabled=0 splash loglevel=3'
$ GRUB_CMDLINE_LINUX=""
$
$ # Preload both GPT and MBR modules so that they are not missed
$ GRUB_PRELOAD_MODULES="part_gpt part_msdos"
$
$ # Uncomment to enable booting from LUKS encrypted devices
$ #GRUB_ENABLE_CRYPTODISK=y
$
$ # Set to 'countdown' or 'hidden' to change timeout behavior,
$ # press ESC key to display menu.
$ GRUB_TIMEOUT_STYLE=menu
$
$ # Uncomment to use basic console
$ GRUB_TERMINAL_INPUT=console
$
$ # Uncomment to disable graphical terminal
$ #GRUB_TERMINAL_OUTPUT=console
$
$ # The resolution used on graphical terminal
$ # note that you can use only modes which your graphic card supports via VBE
$ # you can see them in real GRUB with the command `videoinfo'
$ GRUB_GFXMODE=auto
$
$ # Uncomment to allow the kernel use the same resolution used by grub
$ GRUB_GFXPAYLOAD_LINUX=keep
$
$ # Uncomment if you want GRUB to pass to the Linux kernel the old parameter
$ # format "root=/dev/xxx" instead of "root=/dev/disk/by-uuid/xxx"
$ #GRUB_DISABLE_LINUX_UUID=true
$
$ # Uncomment to disable generation of recovery mode menu entries
$ GRUB_DISABLE_RECOVERY='true'
$
$ # Uncomment and set to the desired menu colors.  Used by normal and wallpaper
$ # modes only.  Entries specified as foreground/background.
$ #GRUB_COLOR_NORMAL="light-blue/black"
$ #GRUB_COLOR_HIGHLIGHT="light-cyan/blue"
$
$ # Uncomment one of them for the gfx desired, a image background or a gfxtheme
$ #GRUB_BACKGROUND="/path/to/wallpaper"
$ GRUB_THEME="/boot/grub/themes/CyberGRUB-2077/theme.txt"
$
$ # Uncomment to get a beep at GRUB start
$ #GRUB_INIT_TUNE="480 440 1"
$
$ # Uncomment to make GRUB remember the last selection. This requires
$ # setting 'GRUB_DEFAULT=saved' above.
$ #GRUB_SAVEDEFAULT=true
$
$ # Uncomment to disable submenus in boot menu
$ GRUB_DISABLE_SUBMENU='false'
$
$ # Probing for other operating systems is disabled for security reasons. Read
$ # documentation on GRUB_DISABLE_OS_PROBER, if still want to enable this
$ # functionality install os-prober and uncomment to detect and include other
$ # operating systems.
$ #GRUB_DISABLE_OS_PROBER=false #Remove the # at the beginning to uncomment this line.
$ GRUB_EARLY_INITRD_LINUX_STOCK=''
$ GRUB_TOP_LEVEL='/boot/vmlinuz-linux-cachyos'- Press Ctrl + O then Enter to save the changes.
- Press Ctrl + X to exit the nano file editor.
Now we need to install os-prober as mentioned in the comment in the above file. To do so run the following commands in the terminal:
$ sudo pacman -Sy os-prober #Installs os-prober
$ sudo grub-mkconfig -o /boot/grub/grub.cfg #This command updates GRUB
You should now see an output in the terminal which should look like the below. It should say Found Windows Boot Manager and this means it has added Windows to the GRUB boot manager screen.
$ Generating grub configuration file ...
$ Found theme: /boot/grub/themes/cachyos/theme.txt
$ Found linux image: /boot/vmlinuz-linux-cachyos
$ Found initrd image: /boot/initramfs-linux-cachyos.img
$ Warning: os-prober will be executed to detect other bootable partitions.
$ Its output will be used to detect bootable binaries on them and create new boot entries.
$ Found Windows Boot Manager on /dev/nvme0n1p1@/EFI/Microsoft/Boot/bootmgfw.efi
$ Adding boot menu entry for UEFI Firmware Settings ...
$  done
Troubleshooting
Boots into Windows and not the GRUB boot manager screen
If you boot straight into Windows after the install then we need to change the boot loader order in the BIOS.
- Restart your computer and enter your BIOS settings (use ESC, F8, F9, F10 or F12).
- Change your UEFI Boot Order so that the GRUB option is the primary (first) in the boot list.
- Save the changes and reboot the computer.
- This will now open the GRUB boot manager screen on startup.
Virtual Machine Install - Asking for liveuser password
When booting from a USB media to install CachyOS on a virtual machine you may be greeted by the below screen.
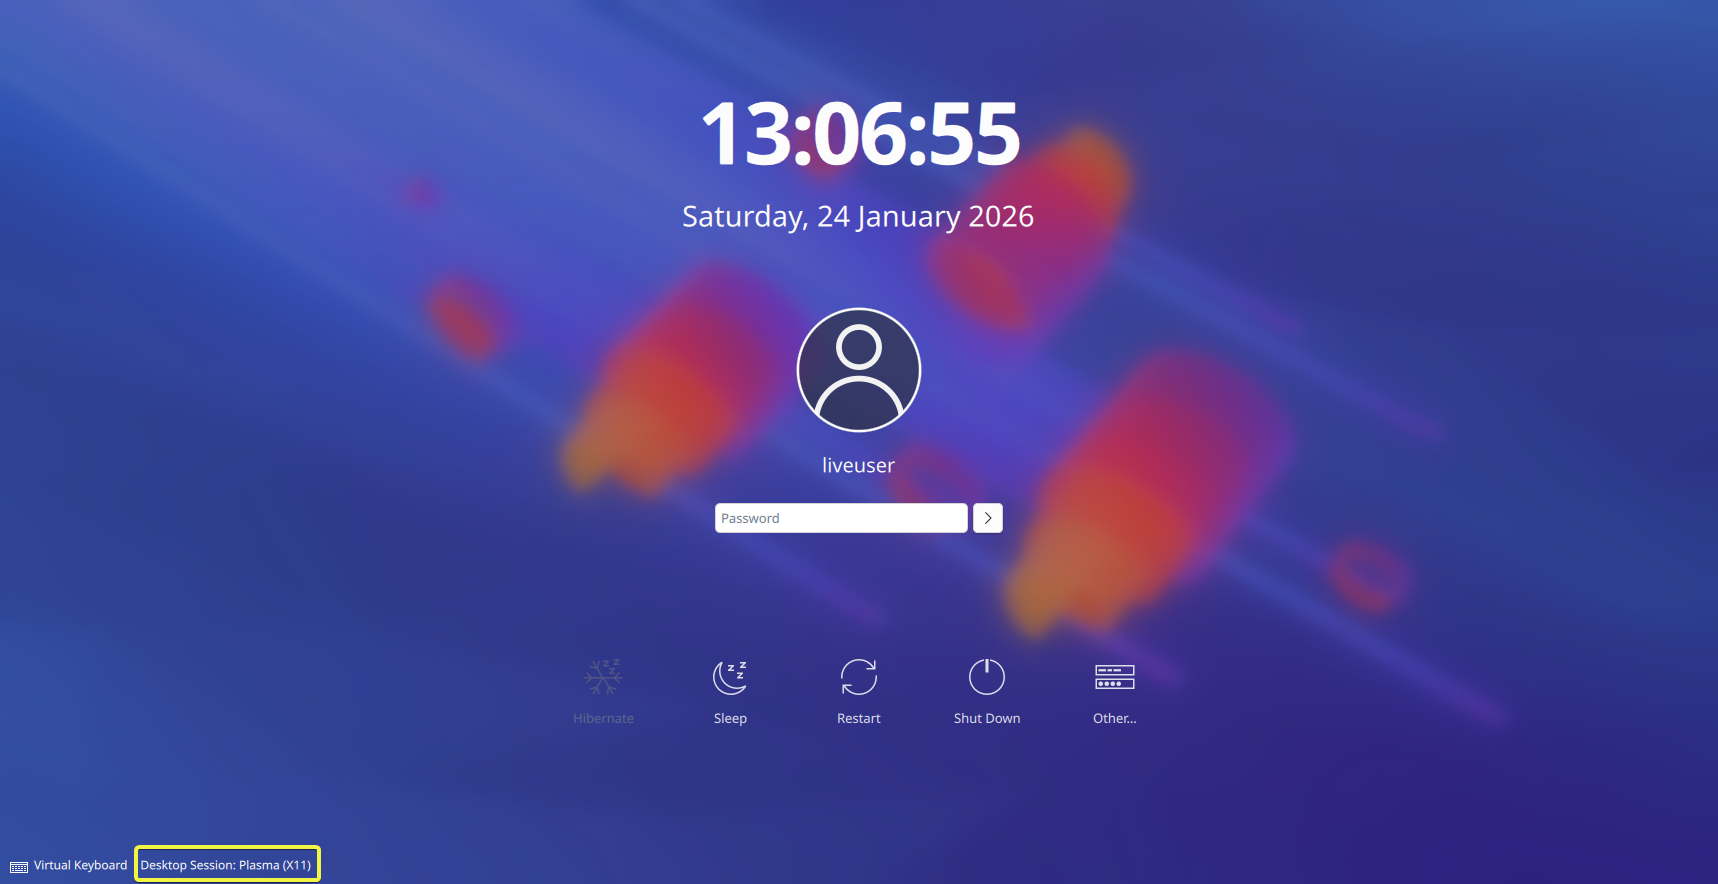
CachyOS doesn't set passwords by default and there is no password. To get past the login screen switch your session to wayland then press enter with no password inputted and this will take you to the live desktop.
System Freezes During Package Building - Out of Memory (OOM) Wiki
The Magic SysRq key is a powerful low-level feature in Linux that allows you to perform various commands directly to the kernel, even if the system seems completely unresponsive. It’s extremely useful for troubleshooting and safely recovering from system crashes.
This requires the SysRq functionality to be enabled in the kernel:
Check by running
$ cat /proc/sys/kernel/sysrqBelow are the expected results:
| Bit Value | Function |
|---|---|
| 0 | Disabled |
| 1 | 0x1 → Fully Enable |
| 2 | 0x2 → Enable sync (s) |
| 4 | 0x4 → Enable remount read-only (u) |
| 8 | 0x8 → Enable process signals (e and i) |
| 16 | 0x10 → Enable reboot/poweroff (b and o) |
| 32 | 0x20 → Enable unraw (r) |
| 64 | 0x40 → Enable debug dumps (p, m) |
You want this to return 1 so all features are enabled. To change this run the following command.
$ sudo nano /etc/sysctl.d/99-sysrq.conf
$ #Then add the below line to the file and save
$ kernel.sysrq = 1
$ sudo sysctl --system #Apply the changes
$ cat /proc/sys/kernel/sysrq # Verify the changes, this should show 1 now.
Now you can fully use the Magic SysRq key feature, to do this you use the key combination:
- Alt + SysRq (Print Screen) + <command key option>
| Command Key | Action | Notes |
|---|---|---|
| r | Switch keyboard from raw to XLATE mode | Fixes frozen input |
| e | Send SIGTERM to all processes | Graceful shutdown attempt |
| i | Send SIGKILL to all processes | Forces processes to quit |
| s | Sync all filesystems | Flushes disk buffers |
| u | Remount all filesystems read-only | Prevents corruption |
| b | Reboot immediately | Hard reboot, does not sync disks |
| o | Power off immediately | Hard poweroff, does not sync disks |
| t | Dump task states | Useful for debugging frozen tasks |
| m | Show memory usage | Can help diagnose memory issues |
| f | Call OOM Killer on the current process | Useful if a single process is stuck |
Safe Shutdown Sequence – REISUB
- Mnemonic: Raising Elephants Is So Utterly Boring
- Sequence for safely rebooting a frozen system:
Alt + SysRq + R  # Take control of keyboard
Alt + SysRq + E  # Send SIGTERM to processes
Alt + SysRq + I  # Send SIGKILL to processes
Alt + SysRq + S  # Sync filesystems
Alt + SysRq + U  # Remount filesystems read-only
Alt + SysRq + F  # Optional: kill current process if consuming all memory
Alt + SysRq + B  # Reboot
BTRFS Log Tree Startup Error
During startup if you get a similar error code to the below:
$ You are in emergency mode. After logging in, type "journalctl -xb" to view system logs, "systemctl reboot" to reboot, or "exit" to continue boot up.
$ Cannot open access to console, the root account is locked.
$ See sulogin(8) man page for more details
$ Press Enter to continue.
$ #Press enter then the following appears
$ Reloading system manager configuration.
$ Starting initr4.target
$ BTRFS: error (device nvme2n1p2 state A) in __btfrs_run_delayed_items:1181: errno=-17 Object already exists
$ BTRFS: error (device nvme2n1p2 state EAO) in do_abort_log_replay:190: errno=-17 Object already exists
$ BTRFS critical (device nvme2n1p2 state EAO): log tree (for root 257) leaf currently being processed (slot 44 key 23688878 12 74551):
$ BTRFS critical (device nvme2n1p2 state EAO): log replay failed in unlink_inode_for_log_replay:1062 for root 257, stage 3, with error -17: failed to run delayed items current inode 1720579 parents xt root 257
$ BTRFS: error (device nvme2n1p2 state EAO) in btrfs_recover_log_trees:7736: errno=-17 Object already exists
$ BTRFS: error (device nvme2n1p2 state EAO) in btrfs_replay_log:2094: errno=-17 Object already exists (failed to recover log tree)
The key points of the above message are
BTRFS critical: log replay failed
errno=-17 Object already exists
failed to recover log tree
This means:
- The Btrfs journal (log tree) is corrupted.
- Btrfs refuses to mount normally so boot halts.
To fix this we need to clear the Btrfs log:
Boot from a live USB (Use the same USB drive setup you used to install CachyOS). Next looking over the error it mentions device nvme2n1p2 which is the Btrfs partition with the issue however we will confirm this in the steps below.
In the terminal:
$ lsblk -f #This lists block devices and shows filesystem-related information. In my case I should see "nvme2n1p2   btrfs"
$ sudo btrfs rescue zero-log /dev/nvme2n1p2 #Change nvme2n1p2 to match your device name!
$ reboot
What this does:
- Deletes the corrupted journal
- Does not delete your data
- Forces a clean mount next boot
Once you are booted back into your system you should run the below command to verify checksums, repairs silent corruption using redundancy and gives peace of mind after a crash.
$ sudo btrfs scrub start -Bd /Note: This happened to me during a yay install and build of a package.
Downloading through the package manager is slow or there are network errors
Doing both these steps should fix the issue:
sudo cachyos-rate-mirrorsparu -Syu
Programs/apps won’t launch
Use the utility called strace to find the cause.
$ sudo pacman -Sy strace #Install strace
$ strace vlc #Then use strace <application> and it will print any errors in the terminal.
Tweaks and Improvements
Enabling Parallel downloads
When using pacman to install and upgrade you can enable or allow more parallel downloads to speed up the process. To do so
$ sudo nano /etc/pacman.confBelow are the first 42 lines from the config file. Look for ParallelDownloads = 5 and change this to 10.
#
# /etc/pacman.conf
#
# See the pacman.conf(5) manpage for option and repository directives

#
# GENERAL OPTIONS
#
[options]
# The following paths are commented out with their default values listed.
# If you wish to use different paths, uncomment and update the paths.
#RootDir     = /
#DBPath      = /var/lib/pacman/
#CacheDir    = /var/cache/pacman/pkg/
#LogFile     = /var/log/pacman.log
#GPGDir      = /etc/pacman.d/gnupg/
#HookDir     = /etc/pacman.d/hooks/
HoldPkg     = pacman glibc
#XferCommand = /usr/bin/curl -L -C - -f -o %o %u
#XferCommand = /usr/bin/wget --passive-ftp -c -O %o %u
#CleanMethod = KeepInstalled
#UseDelta    = 0.7
Architecture = auto

# Pacman won't upgrade packages listed in IgnorePkg and members of IgnoreGroup
#IgnorePkg   =
#IgnoreGroup =

#NoUpgrade   =
#NoExtract   =

# Misc options
#UseSyslog
Color
ILoveCandy
#NoProgressBar
#CheckSpace
VerbosePkgLists
DisableDownloadTimeout
ParallelDownloads = 5 #<<<<<<< Edit this line to be 10.
DownloadUser = alpm
Automatic package cache cleaning Wiki
Downloading package updates can take up a large amount of space over time, this will automatically clear the cache for you. The below instructions will clear the cache weekly but leave 3 of the most recent versions of each package in case you need to downgrade anything.
$ sudo systemctl enable paccache.timerCPU Core Balancing Github
Using irqbalance we can use this to distribute hardware interrupts across CPU cores to prevent one core (often CPU0) from becoming overloaded. This helps reduce microstutter in games, improves frametime consistency and is especially useful on 6+ core CPUs.
$ sudo pacman -Sy irqbalance #Install irqbalance
$ sudo systemctl enable --now irqbalance.service #Enable
Caution: If your CPU only has 4 cores or you are manually pinning CPUs for gaming then don't follow this section.
Snapper (Snapshot Setup) Wiki
Use this useful guide here.
Gaming Fixes
Making Steam games launch much faster
- Go to Steam Settings → Downloads.
- Scroll down until you see Shader Pre-Caching, then disable Enable Shader Pre-caching.
Counter-Strike 2
- No Audio - Add
-sdlaudiodriver pulseon Steam launch options setting.
Guides
Caution: All links here unless specified are NOT affiliated with me.
Miscellaneous
Related Articles
All guides
Linux
04 February 2026
Useful Keyboard Shortcuts
Linux
02 February 2026
Senka's CachyOS Plasma KDE Setup
Linux
02 February 2026
Useful Terminal Commands
Linux
25 January 2026
Managing Dotfiles
Linux
23 January 2026